About Astonio
 The Generio framework is an open-source JavaScript tool that generates ready-to-go data management applications that you can configure quickly and easily. Whether you are an individual programmer, a member of a software development team, or an in-house IT-specialist, you will find that it boosts your productivity and saves weeks of code writing.
Only three steps to a ready-to-use application
-
Download
or code the backend for your data source
-
Set up
your application and get a ready-to-use interface
-
Program
any extra features that you require
Why choose the Generio framework
 Its is free and
open-source Mainly based on JavaScript
 Adaptive to any
data source Cross platform and suppors cloud technologies
 Easily integrated with web applications
 Easy for teams of developers to use
How it works
The Generio framework works with any data source (be it a database server or any server application serving as a source of data and coded in any programming language).
The framework provides:
- Mechanisms for the interaction of data objects and for displaying these interactions on your interface.
- A backend the serves as a bridge between the framework and your data source.
- Automatically generated forms (lists, records, filters) and interactive control elements for data processing.
On top of that, there is a vast set of tools that enables you to build the precise application you need. In addition, you can extend the framework itself or implement the modules created by other developers.
You can flexibly configure data source using your prefered language. The framework interacts with the data source using a corresponding backend module. It defines all the logics for how the data received from the data source is to be processed and what data is to be sent back. In the backend you define a communication protocol with the data source. Alternatively you will soon be able to download and set up the pre-built backends that are available for various data source types.
Once the framework has generated an application, you may wish to keep it as it is, or code new extensions to it. You can enhance the interface to meet your needs by using our set of JavaScript modules and functions, and you can extend the data source server's logics in your programming language. The framework provides you with a choice: to develop an interface or its part quicker yet less flexibly, or develop it more slowly yet create a more functional interface.
In-built interface
In the in-built interface, all the data editing elements are designed to be used both in forms and in tables. The elements have useful features that simplify data processing for the user. Let us have a look at a few examples.
Here is an example of a text field.
By clicking the corresponding button, it expands into a bigger field, which is helpful when there is more text than the small input element can accommodate.
When it comes to numeric input elements, they support math expressions right inside them.
The object selection element also has a few input modes: it allows the choosing of objects either from a drop-down list with an in-built search function or from a standalone popup form.
As for data input errors, the framework’s interface shows them not under the element, but rather inside it as a special marker. Such an approach means that the density of form elements is kept and their arrangement is retained when mistakes appear. The mistakes are displayed in the same way when data are presented in the table mode.
Interaction between interface and data
In the framework, much attention is paid to efficient interactions between records (objects).
Thus, when a user selects a record in a list and modifies it in the opened form, the record gets updated in the initial list automatically.
When a record is being changed simultaneously on different devices, users get instant notifications about any changes happening to the record they are working with.
The framework’s interface also allows for a mechanism that sorts the rows of dependent records (if it is supported by the data model being used).
These examples amount to only a tiny part of all the features put into the framework. A more detailed description is the subject of separate articles. Also worth repeating, none of the tools or methods are compulsory; they are only presented as the basis for development and can be configured according to the will of the developer.
Models and managing data
When it comes to operating data, a distinction of the framework (compared to Django, for example) is that for describing lists of records and single records, it uses different types of models – namely ListModel and RecordModel. Such an approach allows for displaying lists of not only records from a few models at the same time, but also non-editable rows (for instance, certain results of processing those records).
Despite having the necessary mechanisms to do so, the framework does not require data models to be described when developing an application. Instead, the Backend module generates the necessary data models based on those that already exist in other environments (such as Django, Sequelize, SQL etc).
The framework shares some features with Django. For instance, the classes used for data queries (QuerySet and Query) are the equivalents of the same-titled Django classes adapted from Python to TypeScript code. Data selection from a database can be coded like this:
backend
  .getListModel('product')
  .getQueryset()
  .filter({name__icontains: "Jacket"})
  .orderBy('-price')
  .limit(0,10)
  .getRows()
  .subscribe(products => {…});
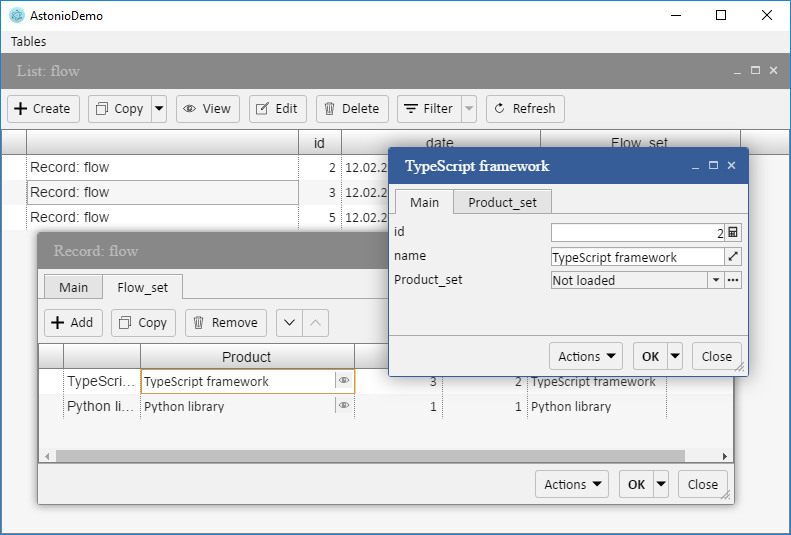
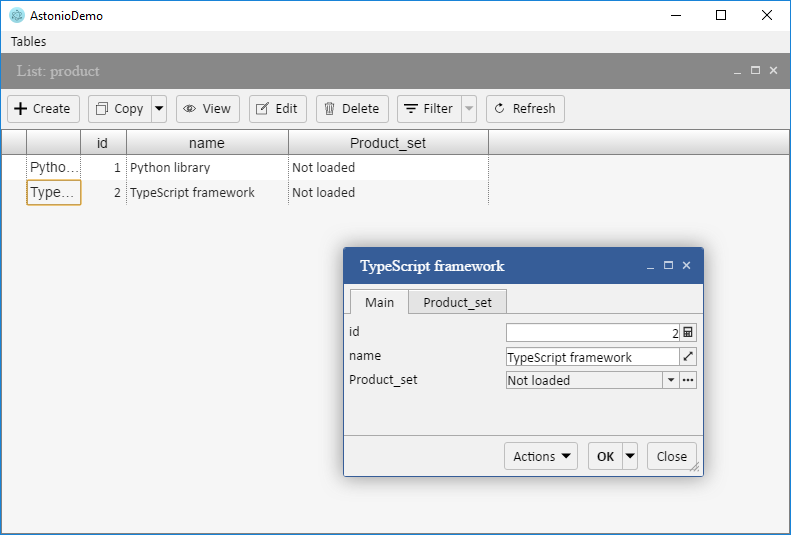
Another distinguishing feature of the framework is virtual fields. When a virtual field changes, it may subsequently change real fields of objects it represents and vice versa. Something similar occurs in Django when we use xxxxxx_set property to get objects linked to other objects; or when we access an object through a property, when the database stores only this object’s id.
In the illustration below, fields product_id and product_name are real, whilst field product is virtual.
The framework supports the ‘lazy loading of dependent records’. Unlike Django though, here a programmer is free to decide either to use this mechanism or toget data instantly to reduce the quantity of queries between the client and the server. Thus, in the example above, the product ‘product’ has the field ‘supplier’. By default, suppliers would be drawn from the database only upon request to the field product(‘supplier’); however, after modifying the code like this: .getRows('supplier').subscribe(products => {…}); – each product from the list ‘products’ will also contain data about relevant suppliers and there will be no need for a separate database query to access these data.
Check it out
The instructions for designing applications based on the framework: Quick start
An example of a more elaborated application is available here (the setup guide is in the README.md file).
Quick start
The framework consists of a number of parts (modules). Some are used independently, others only in mutual combinations.
Module Core contains the mechanisms for describing: models; interactions between data objects (records); and requests to database. This module communicates with a data source via module Backend.
Module Backend is a bridge between module Core and a data source. As a source of data, you can utilise either a database server (like SQL) or interlayers for accessing data models of other frameworks (such as Django or Sequelize).
Module Model-UI is responsible for interface generation: it visualises the data provided by module Core.
Module UI contains basic control elements used by module Model-UI for generating interfaces. These elements can be used beyond the framework in external applications.
Module Windows-Manager manages containers for displaying user interfaces. Depending on the specific type of this module, applications can be built for desktop, mobile or any other platforms.
Environment setup
To build a new project with the Generio framework, follow these steps.
Install Angular and start a new project (e.g. astonio-shop).
Open the project’s folder.
Install the dependent modules.
@astonio/core @astonio/ui @astonio/model-ui @astonio/mysql-backend @astonio/ventus-wm mysql2 ssh2 moment inputmask mathjs @angular/cdk @angular/flex-layout ag-grid@9.1.0 ag-grid-angular@9.1.0 electron electron-reload --save-dev
In the file tsconfig.json, set value es6 for compilerOptions.target:
"target": "es6",
Add a themesation feature to the interface. In .angular-cli.json add: 'theme.scss' inside the section app.styles.
Open the src folder and create the file theme.scss with the following code:
@import '~@astonio/ui/theming';
@import '~@astonio/model-ui/theming';

$ast-base-theme: ast-ui-base-theme();

@include ast-ui-theme($ast-base-theme);
@include ast-model-ui-theme($ast-base-theme);
In the index.html find
<base href="/">
and replace the slash with a dot.
Now set up Electron. In the project root folder create a file called main.js with the following code:
const electron = require('electron')

// Module to control application life.
const app = electron.app
// Module to create native browser window.
const BrowserWindow = electron.BrowserWindow
const path = require('path')
const url = require('url')

require('electron-reload')(__dirname);

// Keep a global reference of the window object, if you don't, the window will
// be closed automatically when the JavaScript object is garbage collected.
let mainWindow

function createWindow () {
  // Create the browser window.
  mainWindow = new BrowserWindow({width: 800, height: 600})

  // and load the index.html of the app.
  mainWindow.loadURL(url.format({
    pathname: path.join(__dirname, 'dist/index.html'),
    protocol: 'file:',
    slashes: true
  }));

  mainWindow.webContents.openDevTools({detached: true});

  // Open the DevTools.
  // mainWindow.webContents.openDevTools()

  // Emitted when the window is closed.
  mainWindow.on('closed', function () {
    // Dereference the window object, usually you would store windows
    // in an array if your app supports multi windows, this is the time
    // when you should delete the corresponding element.
    mainWindow = null
  })
}

// This method will be called when Electron has finished
// initialization and is ready to create browser windows.
// Some APIs can only be used after this event occurs.
app.on('ready', createWindow)

// Quit when all windows are closed.
app.on('window-all-closed', function () {
  // On OS X it is common for applications and their menu bar
  // to stay active until the user quits explicitly with Cmd + Q
  if (process.platform !== 'darwin') {
    app.quit()
  }
})

app.on('activate', function () {
  // On OS X it's common to re-create a window in the app when the
  // dock icon is clicked and there are no other windows open.
  if (mainWindow === null) {
    createWindow()
  }
})
In order to work with Electron, Webpack has to be configured in a way that is not supported by Angular-CLI, therefore you need to run the following commands:
ng eject
npm install
Once the file webpack.config.js has been created, add the following lines to the end:
"target": "electron-renderer",
To launch the application more easily, inside the scripts section of the file package.json you can add these two lines:
"app": "electron ./main.js",
"watch": "webpack --watch",
Done. Run the build of the project.
Example of an application development
First, create a database that will be used by your application.
CREATE DATABASE `astonio-demo` CHARACTER SET utf8 COLLATE utf8_general_ci;
Then create a table that will be used to store the list of products.
CREATE TABLE `product` (
`id`  int(11) NOT NULL AUTO_INCREMENT,
`name`  varchar(255) NULL ,
`price`  float(10,2) NULL ,
`barcode`  varchar(15) NULL ,
PRIMARY KEY (`id`)
) ENGINE=InnoDB DEFAULT CHARSET=utf8 ROW_FORMAT=DYNAMIC;
or use your own database
In the src folder open the file app.module.ts and import the following libraries:
import {FlexLayoutModule} from '@angular/flex-layout';
import {SqlBackend} from '@astonio/mysql-backend';
import {Backend} from '@astonio/core';
import {AstonioUIModule, WindowsManager, BaseDataStorageService, LocalDataStorageService} from '@astonio/ui';
import {VentusWindowsManager} from '@astonio/ventus-wm';
import {AstonioModelUIModule} from '@astonio/model-ui'
Set up your MysqlBackend:
export var backend = new SqlBackend({
  host: 'localhost',
  user: 'root',
  password: '',
  database: 'DATABASE_NAME'
});
In the imports section add the following lines:
FlexLayoutModule,
AstonioUIModule.forRoot(),
AstonioModelUIModule.forRoot(),
And in the providers section add these lines:
{provide: Backend, useValue: backend},
LocalDataStorageService,
VentusWindowsManager,
{provide: WindowsManager, useExisting: VentusWindowsManager},
{provide: BaseDataStorageService, useExisting: LocalDataStorageService},
Then copy and paste the following files into the assets folder:
assets/ag-grid/ag-grid.css (from node-modules/ag-grid)
assets/ag-grid/theme-fresh.css (from node-modules/ag-grid)
assets/ventus/ventus.js (from node-modules/@astonio/ventus-wm)
assets/ventus/ventus.css (from node-modules/@astonio/ventus-wm)
Open the file index.html and add the following lines to import the required scripts and styles:
<script src="https://astonio.com/framework/src/assets/ventus/ventus.js"></script>
<link href="assets/ventus/ventus.css" rel="stylesheet" type="text/css" />
<link href="assets/ag-grid/ag-grid.css" rel="stylesheet" type="text/css" />
<link href="assets/ag-grid/theme-fresh.css" rel="stylesheet" type="text/css" />
The preliminary work is completed! Now for coding the application itself.
Replace the whole content of the file app.component.html with the following:
<div style="height:100%; width:100%; left:0; top:0; position:absolute; display:table;">
  <div style="display:table-row;">
    <ast-menu>
      <ast-menu-item text="Tables">
        <ast-popup-menu>
          <ast-popup-menu-item *ngFor="let table of tables" [text]="table" (click)="openListWindow(table)"></ast-popup-menu-item>
        </ast-popup-menu>
      </ast-menu-item>
    </ast-menu>
  </div>
  <div id="wndViewport" style="display:table-row;height:100%;background-color:#444" #container></div>
</div>
Then, update the file app.component.ts as shown here:
import { Component, ViewContainerRef, ChangeDetectorRef, OnInit, ViewChild } from '@angular/core';
import { WindowsManager } from '@astonio/ui';
import { Backend, ListModel } from '@astonio/core';
import { ModelWindowsDispatcher } from '@astonio/model-ui';

@Component({
  selector: 'app-root',
  templateUrl: './app.component.html',
  styleUrls: ['./app.component.css'],
})
export class AppComponent implements OnInit {
  @ViewChild('container', { read: ViewContainerRef }) containerVCR;
  tables:ListModel[] = [];

  constructor(private wm:WindowsManager, private mwd:ModelWindowsDispatcher, private vcr:ViewContainerRef, private backend:Backend, private cdr:ChangeDetectorRef) {
    this.backend.bootstrapped.subscribe(() => {
      this.tables = [...this.backend.listModels.values()];
      this.cdr.detectChanges();
    });
  }

  openListWindow(listModel:ListModel) {
    var wndClass = this.mwd.getListWindow(listModel);
    var wnd = this.mwd.getListWindow(listModel, false, null, true).subscribe(wndInfo => {
      new wndInfo.window(this.wm, null, Object.assign({}, wndInfo.windowOptions, {list:listModel}));
    });
  }

  ngOnInit() {
    this.wm.initVCR(this.containerVCR);
  }
}
Now build the project (if it has not happened automatically) and run Electron. You must get an application allowing for creating and viewing the list of the products.
The demo application built using this instruction is available on GitHub – github.com/astoniocom/astonio-demo